Overview and Highlights.
The Skylight is an SL photography tool that makes it easier for you to work with WindLight (SL's natural lighting), and with camera angles.
For your photoshoot you might have a certain mood in mind, requiring that very specific ambient lighting, but only from the name it's difficult to guess the effect of a WindLight preset. Or you might have a handful of favorite presets; by now you know their names, but it's a pain to apply them, scrolling through all the available ones.
It might also frustrate you to set up the perfect shot, but once you have your angle, you still need to zoom in and out with your camera to set lighting and props right — or you want the exact same angle for a series of shots; a delicate thing to do since your carefully chosen camera angle can be lost quickly if you're careless for an instant.
This is where Skylight comes in handy, helping you
- browsing existing WindLight presets visually on your personal Skylight web page (Skylight comes with the 735 default viewer presets pre-loaded),
- adding your own WindLight presets,
- creating your set of favorite presets, which you can apply with a single click on the Skylight HUD,
- saving and restoring camera angles.
The HUD.
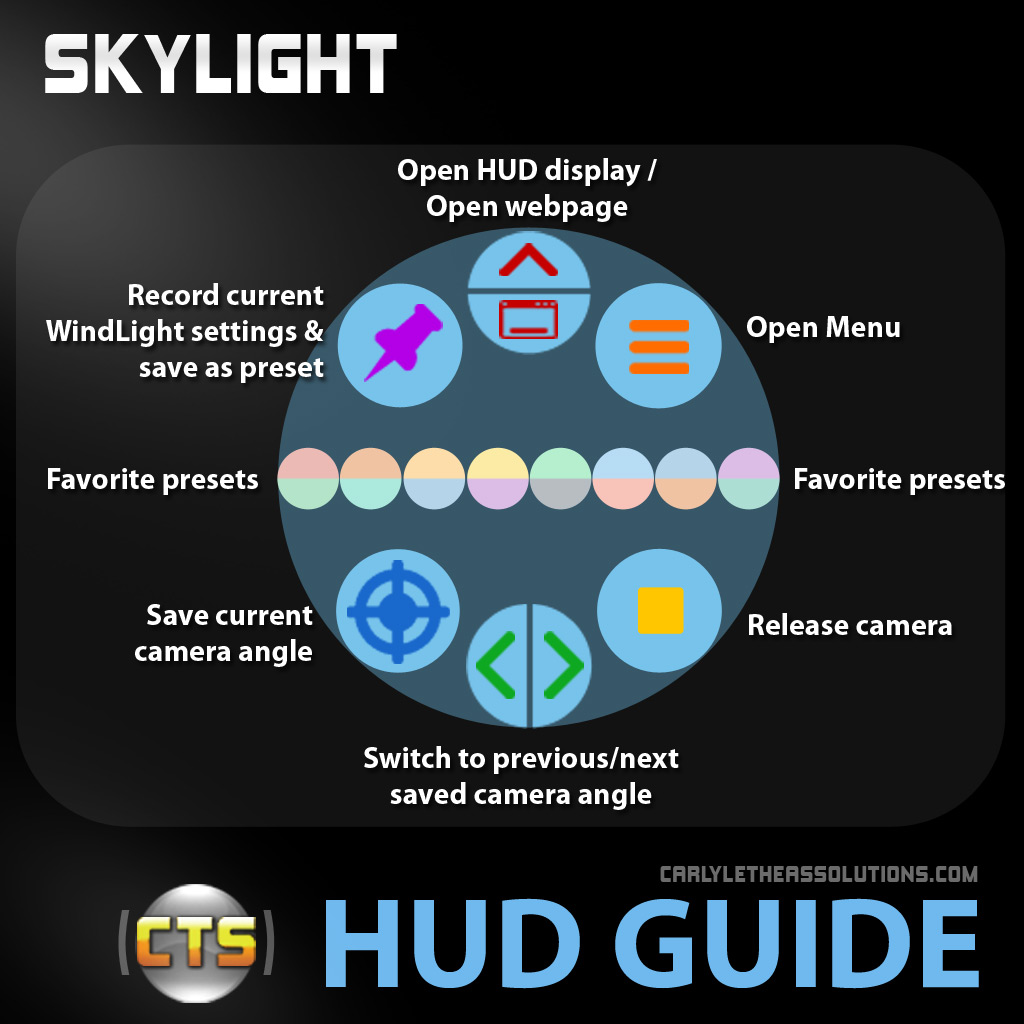
The easy-to-use Skylight HUD is one of the essential parts of the Skylight system. With it, you can apply your favorite WindLight presets with a single click, record the currently active settings as a new preset, and save and restore camera angles. It is also the gateway to your online Skylight web page.
By default, it will attach to the top left HUD attachment point. You can attach it to any HUD attachment point, however.
The HUD looks like this:
The Web Page.
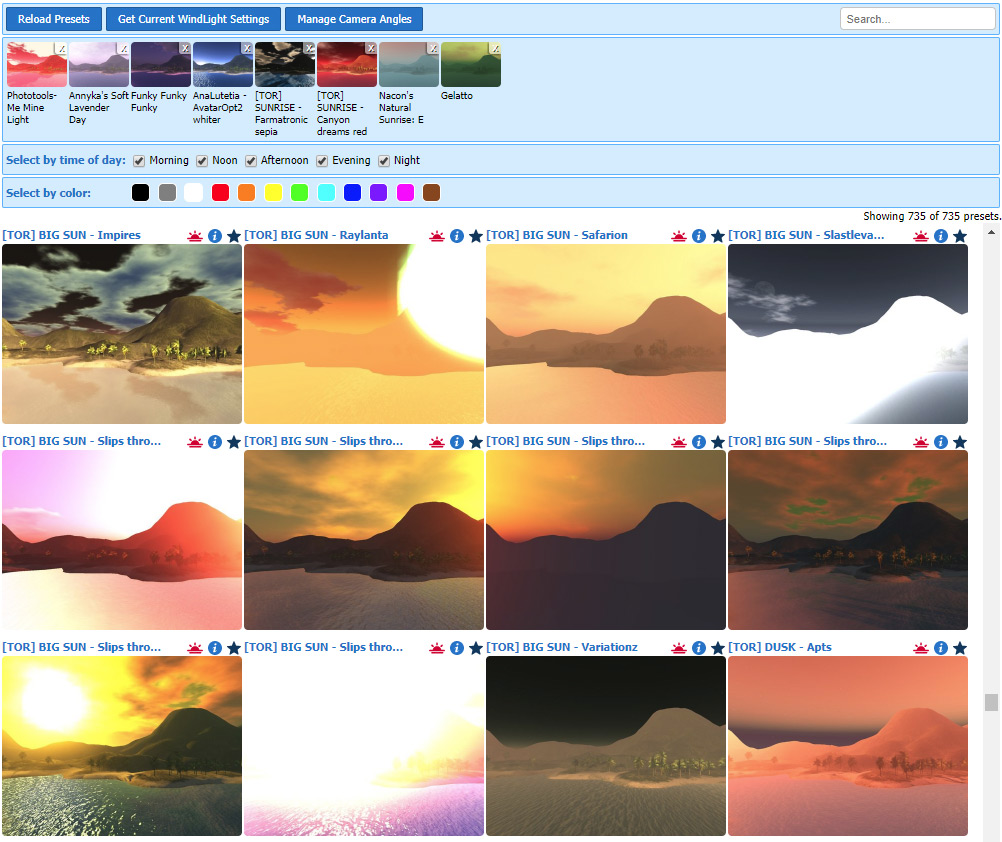
Your personal Skylight web page displays the WindLight presets. It comes pre-loaded with the ones that come with the viewer by default and are searchable by name, time of day, and color.
Each of the preset has icons to
 apply it (make sure that you're wearing the HUD and have RLV turned on),
 edit it and display its parameters,
 add it to your favorites,
 share a preset (only displayed for custom presets).
Looking for Presets
If you know the name of a preset, you can type the name (or a part of it) into the search box in the upper right corner of the web page.
The "time of day" filter will display all the presets matching one of the checked times.
The "color" filter filters out presets by color, showing the ones matching all of the selected colors. A color is selected by clicking on it, and the corresponding swatch will appear with a thick black border.
Managing Favorites
To add a preset to the favorites, click its star icon ![]() . You can add as many favorites as you like, but only the first eight will be displayed on the HUD.
. You can add as many favorites as you like, but only the first eight will be displayed on the HUD.
You can rearrange the favorites by dragging the titles.
To delete a favorite, click the X icon in the top right corner.
If you're logged in and wearing the HUD, any changes to the favorites on the web page will be automatically reflected on your HUD.
WindLight Preset Info
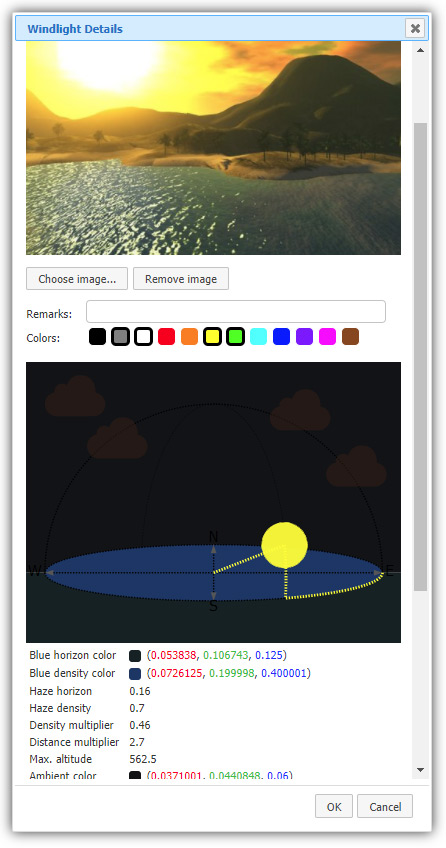
Clicking a preset's "info" button ![]() will show a dialog in which you can edit the preset's title and remarks, and also remove or change the image.
will show a dialog in which you can edit the preset's title and remarks, and also remove or change the image.
The dialog also displays a schematic diagram, that depicts the sun/moon position and the various colors associtated with the preset, as well as a visualization of the cloud density.
Below the diagram the numerical values of the parameters are listed. They are read-only. If you want to change them, you can load the preset by clicking its ![]() button and then make the changes in your viewer's WindLight editor.
button and then make the changes in your viewer's WindLight editor.
Then you can save it as a new preset by clicking the HUD's ![]() button or the "Get Current WindLight Settings" on the web page.
button or the "Get Current WindLight Settings" on the web page.
Reloading Presets
If you added a new preset on your HUD by clicking the ![]() button, click the "Reload Presets" button on the web page to make the new preset appear.
button, click the "Reload Presets" button on the web page to make the new preset appear.
Getting Current WindLight Settings
Clicking "Get Current WindLight Settings" will make the HUD collect the parameters of the currently active WindLight setting and send them to the web page, which will display the diagram and the parameters.
The dialog gives you the option to save it as a new preset.
To add remarks or a picture, open the new preset's info box after it has been saved.
Managing Camera Angles
The web page lets you also list, rename, and delete all the camera angles you've saved. The camera angles are listed by region ("sim"); the region you're currently in is highlighted.
To see the list of your camera angles, click the "Manage Camera Angles" button.
Sharing Presets and Camera Angles
You can share your own custom presets, and also your camera angles, with others. To do so, click the ![]() icon of a preset or a camera angle, and you'll see a box showing a share code.
icon of a preset or a camera angle, and you'll see a box showing a share code.
Give this code to the person you want to share the item with.
To import a shared item, click the "Import Shared Item" button in the toolbar on the web page and paste the code into the box. When clicking "OK" the item will be imported into your Skylight.